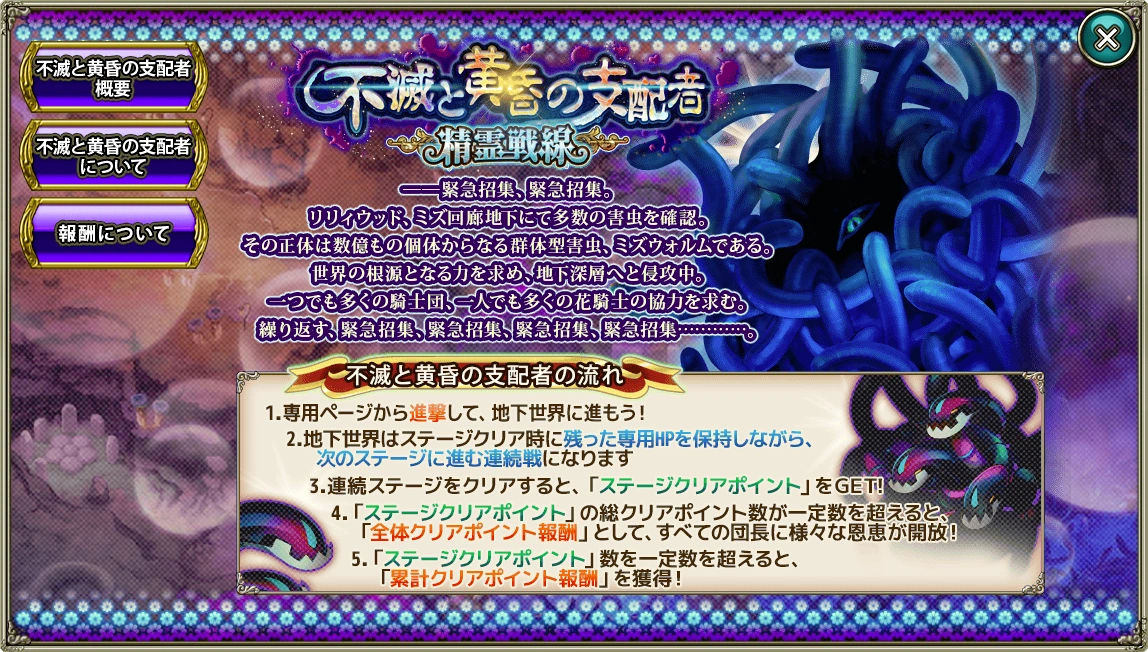
Decisive Battle with Midgardsormr (ミズウォルム決戦イベント) is a time-limited Mission that takes place alongside Events. It was first held on July 22nd, 2019. Players take their teams to go deep into the ground to stop the Midgardsormrs from attacking the World Flowers' source of power. Your individual progress lets you earn rewards for yourself. All players' collective progress will grant rewards for every player after the mission ends. The mission lasts for about two weeks.
As of 2023/07/31: Decisive Battle with Midgardsormr was made permanently available under Three Major Decisive Battles. Story Mission - Part 2, Chapter 9 must be completed in order to unlock these stages.
How to Play[]
Areas and Stages[]


The mission is divided into eight Areas (エリア) which each comprise of multiple Stages (ステージ). The event's 1st week only lets you go through Areas 1-4 while Areas 5-8 only become available in the 2nd week. Deeper Areas contain more difficult enemies. The final stage of each Area has a boss stage - while all the stages that precede it are randomly chosen from one of these types:
- A stage with enemies and chests
- A stage with more than the usual number of chests
- A stage that heals flower knights
- A stage that fills the Light Gauge
Breakthrough Rewards[]
If even one party reaches the goal in a stage, you are awarded with Breakthrough Rewards (突破報酬) which go directly to your Present Box. You can only earn the breakthrough rewards once per stage. Note that Normal and Hard difficulties share the breakthrough rewards, so if you earned the rewards in one difficulty already you can't earn them again just by switching the difficulty.
Normal and Hard[]
The mission is split into two difficulties: Normal (ノーマル) and Hard (ハード).
Similarities:
- The Breakthrough Rewards are the same.
- You cannot change the difficulty while Advancing (進撃).
- You can change the difficulty after Annihilation (全滅) or Evacuation (撤退).
- After Annihilation or Evacuation, your World Flower Protection, Consecutive Successful Advances and Stage Clear Point Multiplier get reset.
Differences:
- Hard has more difficult battles
- Hard has better rewards in chests
- Hard rewards more Clear Points
Moving Between Stages[]
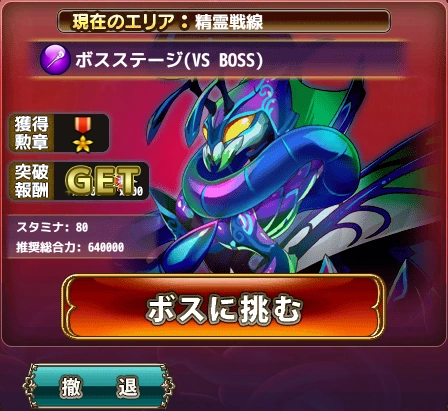
Before Boss
Right before an Area's boss stage, you can click the orange button Challenge the Boss (ボスに挑む) to do the boss stage or the teal button Evacuation (撤退) to go back to the Area's first stage. Evacuation might be a good idea if your World Flower Protection is low, however there are consequences as your Consecutive Successful Advances and Stage Clear Point Multiplier get reset.
After Boss
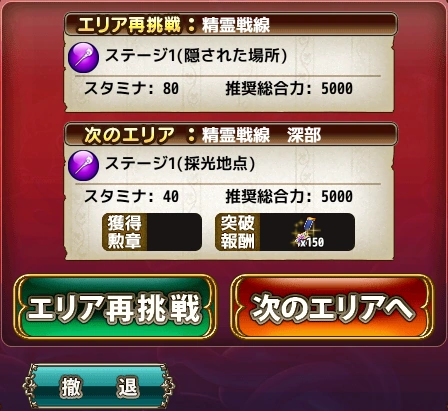
Right after defeating an Area's boss stage, you can click the orange button To Next Area (次のエリアへ) to proceed to the next Area or the green button Area Re-Challenge (エリア再挑戦) to challenge the whole Area again. The orange button will not appear if there are no Areas that follow after. Re-Challenging on the last Area available repeatedly will help boost your Stage Clear Point Multiplier.
Evacuation vs Retreat[]
Evacuation (撤退) is the option to give up an Area you are progressing through. If you evacuate - your World Flower Protection, Stage Clear Point Multiplier, and Consecutive Successful Advances all get reset.
Retreat (退却) is the common option available on every Subjugation that lets you leave the stage you're playing. If you retreat, your World Flower Protection goes back to whatever it was when you had started the stage. The Stage Clear Point Multiplier and Consecutive Successful Advances remain the same.
World Flower Protection[]
World Flower Protection (WFP) (世界花の加護) is a collective HP bar for your entire set. Every character in your set contributes 5% of their current percentage HP to this. This means you will start out with 100% WFP if you have a full set of 20 characters (20 characters * 5% = 100% WFP). If you start out with fewer than 20 characters, you will have less than 100% WFP. For example, 5 characters in a Set will result in 25% WFP.
Note that your WFP is retained when advancing through Stages.
WFP Loss[]
The WFP goes down when flower knights take damage. The damage a character takes in relation to their max HP is taken off of their 5% WFP contribution. Simply put, a character contributes 5% of the WFP, so getting hurt can reduce 5% all the way down to 0%. If a character drops to 0HP, they will revive after advancing. However, the WFP will then be split across all characters in the set.
For example, if your set has 20 characters, 10 characters drop to 0 HP, and the other 10 are at max HP, then the WFP will be at 50%. When you advance, all 20 characters will now be at 50% HP.
For example, if you had 50% WFP from the previous stage, but then removed 10 characters from the set before advancing, the WFP would still be 50% and each character would constitute 5% of the WFP, so all 10 characters would be at max HP.
Be aware that if you remove characters from your set, and the 5% contribution of each flower knight is less than the WFP you started with, the WFP will be reduced to however much the flower knights can contribute. For example, if you start with 100% WFP, but change your composition from having 20 characters to only five, then the WFP will be reduced to 25% because the five characters contributing 5% of their max HP can only get to 25%.
WFP Healing[]
Healing flower knights will restore WFP. However, healing a flower knight above their max HP will have no effect. This means that characters with the Healing Boost Flower Memory cannot contribute more than 5% WFP even if the character has over 100% HP. That said, if a character with Healing Boost has over 100% HP and stays over their max HP after taking damage, the WFP will not decrease because the character's HP never went below 100%. Also keep in mind that you can't heal the WFP more than 5% times the number of characters in your set.
For example, if you start a stage with 15 characters with 60% WFP, no matter how much healing you manage you can only get up to 75% WFP.
Annihilation[]
When WFP reaches 0%, you'll be ejected from the stage you were advancing on. You will have the choice to Challenge Again (再挑戦) or accept Annihilation (全滅). If you Challenge Again, you'll start back on the stage you failed on and your WFP will revert back to what it was before you started the stage. If you choose Annihilation, your WFP, Consecutive Successful Advances, and Stage Clear Point Multiplier get reset. The advancement you've done on an Area gets reset too, so you'll have to redo the Area from stage one.
Clear Points[]
Clear Points (クリアポイント) are obtained by completing stages, with the amount earned depending on the Area and difficulty. Stamina Costs were reduced on March 7th, 2022.
| Stage Details | ||||
|---|---|---|---|---|
| Area | Stage | Stamina Cost | Clear Points (Normal) | Clear Points (Hard) |
| 1 | 地底洞窟 | 10 | 25 | 50 |
| 2 | エダの結界領域 | 20 | 50 | 100 |
| 3 | マニュ居住区 | 30 | 75 | 150 |
| 4 | 精霊戦線 | 50 | 200 | 500 |
| 5 | 精霊戦線 深部 | 20 | 100 | 200 |
| 6 | ????? | 30 | 125 | 250 |
| 7 | 最後の境界 | 50 | 200 | 500 |
| 8 | 根源の世界 根源の世界花 |
50 | 200 | 500 |
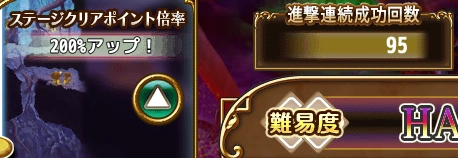
Stage Clear Point Multiplier[]

Clear Point Multiplier (left) and Consecutive Advances (right)
Clearing stages in a row without Evacuation or Annihilation will increase your Consecutive Successful Advances (進撃連続成功回数). As this number goes up, your Stage Clear Point Multiplier (ステージクリアポイント倍率) increases too. The maximum multiplier is 200% from 15 Consecutive Advances. Consecutive Advances continue to be tracked after 15, though they have no effect. Maintaining a high multiplier while grinding stages is vital if you want to earn a large amount of Clear Points before the event ends.
| Clear Points Multiplier | ||
|---|---|---|
| Consecutive Advances | Multiplier (%) | Multiplier (x) |
| 1 | +0% | 1.00x |
| 2 | +25% | 1.25x |
| 3 - 4 | +50% | 1.50x |
| 5 - 6 | +75% | 1.75x |
| 7 - 8 | +100% | 2.00x |
| 9 - 10 | +125% | 2.25x |
| 11 - 12 | +150% | 2.50x |
| 13 - 14 | +175% | 2.75x |
| 15 | +200% | 3.00x |
Rewards[]

Rewards Button
Cumulative Rewards (累計クリアポイント報酬) are distributed immediately to the player's Present Box upon accumulating a certain number of Clear Points. Everyone's Rewards (全体報酬) refer to the collective Clear Point total reached by all players that will be distributed after the event ends.
Cumulative Rewards[]
| Cumulative Rewards | |
|---|---|
| Reward | Clear Points |
| 50000 Gold | 100 |
| 1000 Flower Medals | 200 |
| 20 Year Old Manyu (4-Type) Set x1 | 300 |
| 1000 Flower Medals | 400 |
| 20 Year Old Blum (4-Type) Set x1 | 500 |
| 2000 Flower Medals | 600 |
| EX Equipment Gacha Ticket (Re) x1 | 700 |
| 2000 Flower Medals | 800 |
| Medium Gifts (4-Type) Set x1 | 900 |
| 2000 Flower Medals | 1,000 |
| 10000 High Class Equipment Gacha Seeds | 1,100 |
| 3000 Flower Medals | 1,200 |
| 200000 Gold | 1,300 |
| 3000 Flower Medals | 1,400 |
| 300 Bond Crystals | 1,500 |
| 4000 Flower Medals | 1,600 |
| 1 Ampule of Each Type | 1,700 |
| 4000 Flower Medals | 1,800 |
| 900 Honor Medals | 1,900 |
| 4000 Flower Medals | 2,000 |
| 1000 Sun Medals | 2,250 |
| 5 Petite-Centies | 2,500 |
| 30 Life Crystals | 2,750 |
| 5000 Flower Medals | 3,000 |
| 100 Year Old Manyu (4-Type) Set x1 | 3,250 |
| 100 Year Old Blum (4-Type) Set x1 | 3,500 |
| 5000 Flower Medals | 3,750 |
| Big Gifts (4-Type) Set x1 | 4,000 |
| 5000 Flower Medals | 4,250 |
| 1 Ampule of Each Type | 4,500 |
| 2000 Sun Medals | 4,750 |
| 5 Petite-Centies | 5,000 |
| 7000 Flower Medals | 5,500 |
| 7000 Flower Medals | 6,000 |
| 7000 Flower Medals | 6,500 |
| 7000 Flower Medals | 7,000 |
| 7000 Flower Medals | 7,500 |
| 500000 Gold | 10,000 |
| 500000 Gold | 12,500 |
| 500000 Gold | 15,000 |
| 2 Premium Gacha Tickets | 20,000 |
| 1 Heart of the Blossoming Flower | 25,000 |
| 3 Blossoming Flower Special Services Award (Copper) | 30,000 |
| 7000 Flower Medals | 35,000 |
| 2 Premium Gacha Tickets | 40,000 |
| 3 Blossoming Flower Special Services Award (Silver) | 45,000 |
| 7000 Flower Medals | 50,000 |
| 5 Life Ampules | 60,000 |
| 5 Attack Ampules | 70,000 |
| 5 Defense Ampules | 80,000 |
| 7000 Flower Medals | 90,000 |
| 3 D-Medals | 100,000 |
| 1 Rarity Growth Stone Gacha Ticket | 125,000 |
| 5 Petite-Centies | 150,000 |
| 5 Premium Gacha Tickets | 170,000 |
| 3 Ampules of Each Type | 190,000 |
| 15oo Flower Stones | 210,000 |
| 1 5* Flower Knight Seal Stone '20 | 230,000 |
| 1 Skill Flower of Kodaibana (Rainbow) | 250,000 |
Everyone's Rewards[]
| Everyone's Rewards | |
|---|---|
| Reward | Clear Points |
| 1.2x Gold Up Campaign | 2,000,000 |
| Character Quests' Stamina Cost 30% off | 5,000,000 |
| 100 Year Old Manyu (4-Type) Set x1 | 10,000,000 |
| Standing Missions' Stamina Cost 30% off | 20,000,000 |
| 100 Year Old Blum (4-Type) Set x2 | 30,000,000 |
| 1.4x Gold Up Campaign | 40,000,000 |
| Secret Gardens' Stamina Cost 30% off | 50,000,000 |
| 5 Special Services Award (Silver) | 60,000,000 |
| 1.2x Danchou EXP Up Campaign | 70,000,000 |
| Nation Missions' Stamina Cost 30% off | 80,000,000 |
| 5 Stamina Nectar | 90,000,000 |
| 1.6x Gold Up Campaign | 100,000,000 |
| Re-Reprint Missions' Stamina Cost 30% off | 115,000,000 |
| Silver Forge Spirit (5-Type) Set x5 | 130,000,000 |
| Unique Missions' Stamina Cost 30% off | 145,000,000 |
| 3 D-Medals | 160,000,000 |
| 1.3x Danchou EXP Up campaign | 175,000,000 |
| 100 Year Old Manyu (Random) Set x3 | 190,000,000 |
| Aqua Shadows' Stamina Cost 30% off | 205,000,000 |
| 100 Year Old Blum (Random) Set x3 | 220,000,000 |
| 1.8x Gold Up Campaign | 235,000,000 |
| Gold Forge Spirit (5-Type) Set x5 | 250,000,000 |
| Ultimate Missions' Stamina Cost 30% off | 265,000,000 |
| 5oo Flower Stones | 280,000,000 |
| 1.4x Danchou EXP Up Campaign | 295,000,000 |
| 5 Blossoming Flower Special Services Award (Silver) | 310,000,000 |
| Unique Limit Missions' Stamina Cost 30% off | 325,000,000 |
| 5 Stamina Nectar | 340,000,000 |
| 2.0x Gold Up Campaign | 355,000,000 |
| Ampules (3-Type) Set x8 | 370,000,000 |
| 1.5x Danchou EXP Up Campaign | 385,000,000 |
| 15oo Flower Stones | 400,000,000 |
| 2.01x Gold Up Campaign | 415,000,000 |
| 2.02x Gold Up Campaign | 430,000,000 |
| 2.03x Gold Up Campaign | 445,000,000 |
| 2.04x Gold Up Campaign | 460,000,000 |
| 2.05x Gold Up Campaign | 475,000,000 |
| 10 Petite-Centies | 500,000,000 |
| 2.06x Gold Up Campaign | 600,000,000 |
| 100 Year Old Manyu (4-Type) Set x3 | 700,000,000 |
| 2.07x Gold Up Campaign | 800,000,000 |
| Gold Forge Spirit (5-Type) Set x5 | 900,000,000 |
| 2.08x Gold Up Campaign | 1,000,000,000 |
| 5 Special Services Award (Silver) | 1,100,000,000 |
| 2.09x Gold Up Campaign | 1,200,000,000 |
| 5 Blossoming Flower Special Services Award (Silver) | 1,300,000,000 |
| 2.10x Gold Up Campaign | 1,400,000,000 |
| 5 Premium Gacha Tickets | 1,500,000,000 |
| 2.11x Gold Up Campaign | 1,620,000,000 |
| 5oo Flower Stones | 1,740,000,000 |
| 2.12x Gold Up Campaign | 1,860,000,000 |
| 5 Stamina Nectar | 1,980,000,000 |
| 2.13x Gold Up Campaign | 2,100,000,000 |
| 5 Premium Gacha Tickets | 2,220,000,000 |
| 2.14x Gold Up Campaign | 2,340,000,000 |
| 5oo Flower Stones | 2,460,000,000 |
| 2.15x Gold Up Campaign | 2,580,000,000 |
| 10 Petite-Centies | 2,700,000,000 |
| 2.16x Gold Up Campaign | 3,500,000,000 |
| 2.17x Gold Up Campaign | 4,000,000,000 |
| 2.18x Gold Up Campaign | 4,500,000,000 |
| 2.19x Gold Up Campaign | 5,000,000,000 |
| 2.20x Gold Up Campaign | 5,500,000,000 |
| 2.21x Gold Up Campaign | 6,000,000,000 |
| 2.22x Gold Up Campaign | 6,500,000,000 |
| 2.23x Gold Up Campaign | 7,000,000,000 |
| 2.24x Gold Up Campaign | 8,000,000,000 |
| 2.25x Gold Up Campaign | 9,000,000,000 |
| 2.30x Gold Up Campaign | 10,000,000,000 |
Midgardsormr Battle[]

Midgardsormr Button
In the 2nd week of the event, the final boss Midgardsormr can be be fought after completing all 8 Areas. The boss fight is done by clicking the Midgardsormr button that appears on the event screen. You can fight in either the Normal or Hard difficulty - which can be switched by clicking the green Change (変更) button at the top. Unlike in the Areas, going back and fourth between the two difficulties has no consequences here as there is no effect on the Stage Clear Points Multiplier. Likewise, the WFP does not apply here. The battle costs 80 stamina and there are no repercussions for retreating or losing.
Defeating the boss will grant the player with the Breakthrough Reward (突破報酬) of x5000 Flower Medals, which can only be earned once across both difficulties. The stage still has drop rewards and provides 500 Clear Points. However, because this fight is independent from the Areas, the Stage Clear Point Multiplier has no effect here. Because of that, it is not advisable to use this stage to farm Clear Points.
History[]
- Iteration 01: 2019/07/22 (Thousand-Headed Midgardsormr)
- Iteration 02: 2019/12/23 (Christmas Memories)
- Iteration 03: 2020/06/22 (†Capriccio for the Glittering Stars of Darkness†)
- Iteration 04: 2021/03/08 (Flowers Intertwine - Spring Banquet)
- Iteration 05: 2022/03/07 (Howling Power! The Tournament on the Snow)
- Permanence: 2023/07/31
- Decisive Battle with Midgardsormr was made permanently available.
Translation Notes[]
The basis behind this event's main enemy is Midgardsormr. Midgardsormr has multiple transliterations and translations in Japanese including ミドガルズオルム, ミズガルズの大蛇, ミッドガルド大蛇, ミッドガルド蛇, 世界蛇. The "Mid" part of Midgardsormr is transliterated as ミド (mido), ミッド (middo), or ミズ (mizu) because "d" and "z" can be misheard as the same sound in Japanese.
The main enemy in this event is ミズウォルム. The latter half of its name, ミズウォルム, resembles the latter half of the transliteration written as ミドガルズオルム. Keeping in mind that ミド and ミズ are interchangeable, it's possible that FKG's ミズウォルム is based on the transliteration of ミズガルズオルム.
Although Midgardsormr was a sea serpent, FKG's version is a bunch of earthworms. This could be seen as a pun because ミズウォルム is considered to be an earthworm-type (ミミズ型 / mimizu-gata) of pest. In the same vein as this pun, the latter half of the name, ミズウォルム can be read as ウォーム meaning "worm". Another potential pun on it's name is how these pests where digging under the 水回廊 / mizu kairou / corridor of water which surrounds Lily Wood. In that sense, ミズウォルム / mizuuorumu could be interpreted as water-worm. It's hard to say if this is a stretch because there are species of parasitic worms that live in the water. For example, hairworms take control of the mind of insects that unknowingly ingest the worms' eggs. (Warning: Looking into that stuff is not for the faint of heart).
In light of all the background behind the Japanese name, FKG's ミズウォルム was referred to using a couple names including Water Worm, Earthworm, Mizu Worm, Midgardsormr, etc. On the wiki, Midgardsormr was chosen as the final name for the creature.